Manual installation (zip package)
Step 1
Download MDB 4 Vue Free or MDB 4 Vue Pro package
MDB Vue downloadStep 2
Unzip downloaded package and open it in the code editor
Step 3
Install dependencies.
npm install
Step 4
Run your application.
npm start
Step 5
Explore our documentation (menu on the left). Choose components you like, copy it to your project and compose your website. And yes, it's that simple!
Step 6 (optional)
You can also launch our demonstration app. The files with the code are placed in the demo directory.
npm run demo
Step 7 (optional)
If you want to remove our demo from the app, easily type:
npm run remove-demo
Note: Manual installation with a .zip package is the
easiest way, but many useful features are not available there.
To use the full potential of MDB and all available options, we recommend
installation through
MDB CLI.
MDB CLI
CLI installation is the most efficient way to use MDB. It enables options such as:
- Free hosting (supports custom domains, SSL, FTP access)
-
Install any MDB
package with a single command


- Easy updates with a single command
- Backend starter templates (Laravel, plain PHP, node.js & more)
- WordPress setup in 3 minutes (blog, ecommerce or blank project)
- Git repository for you and your team

Advanced installation
Prerequisites
Before you use MDB Vue make sure to install Vue CLI package (4.0.0 or higher recommended). This package contains environment that will speed up the development process. Node LTS 8.9 or higher is required.
To install Vue CLI, in Your command line type:
npm install -g @vue/cli
Step 1
Create Vue App
vue create my-app
Step 2
Navigate to App's directory
cd my-app
MDB installation
Step 1
Setup MDB
vue add mdb
- choose New app or Existing app template from the list
- select Free version
- choose one of the styling options
- compiled in the mdbvue package (CSS)
- editable in your project (SCSS)
- decide whether to install Roboto font
- decide whether to install Font Awesome 5
Step 2
Launch Your App
npm start
Prerequisites
Before you use MDB Vue make sure to install Vue CLI package (4.0.0 or higher recommended). This package contains environment that will speed up the development process. Node LTS 8.9 or higher is required.
To install Vue CLI, in Your command line type:
npm install -g @vue/cli
Step 1
Create Vue App
vue create my-app
Step 2
Navigate to App's directory
cd my-app
Step 3
Move mdb directory from downloaded zip to your project root.
MDB directory structure: mdb/mdbvue/mdbvue-[version].tgzPlease note that the installation plugin always searches the latest version of the package.
MDB installation
Step 1
Setup MDB
vue add mdb
- choose New app or Existing app template from the list
- select Basic version
- choose one of the styling options
- compiled in the mdbvue package (CSS)
- editable in your project (SCSS)
- decide whether to install Roboto font
- decide whether to install Font Awesome 5
Step 2
Launch Your App
npm start
Prerequisites
Before you use MDB Vue make sure to install Vue CLI package (4.0.0 or higher recommended). This package contains environment that will speed up the development process. Node LTS 8.9 or higher is required.
To install Vue CLI, in Your command line type:
npm install -g @vue/cli
Step 1
Create Vue App
vue create my-app
Step 2
Navigate to App's directory
cd my-app
MDB installation
Step 1
Setup MDB
vue add mdb
- choose New app or Existing app template from the list
- select Pro version
- enter your gitlab access token - see token generation
- choose one of the styling options
- compiled in the mdbvue package (CSS)
- editable in your project (SCSS)
- decide whether to install Roboto font
- decide whether to install Font Awesome 5
Step 2
Launch Your App
npm start
CDN installation
You can easily test MDB Vue components by adding CDN scripts to your classic HTML template without the need for installing any packages.
There is also an option to add MDB Vue Pro to your classic HTML template using static files,
which were delivered via ZIP package. All necessary files are placed inside the lib directory.
            <!DOCTYPE html>
            <html>

            <head>
              <title>MDB Vue Test App</title>
              <meta charset="utf-8">
              <meta name="viewport"
                content="width=device-width, initial-scale=1, maximum-scale=1, user-scalable=no, minimal-ui">
              <link rel="stylesheet" href="https://stackpath.bootstrapcdn.com/bootstrap/4.3.1/css/bootstrap.min.css"
                integrity="sha384-ggOyR0iXCbMQv3Xipma34MD+dH/1fQ784/j6cY/iJTQUOhcWr7x9JvoRxT2MZw1T"
                crossorigin="anonymous">
              <link rel="stylesheet" href="https://cdn.jsdelivr.net/npm/mdbvue/lib/css/mdb.min.css">
            </head>

            <body>

              <div id="app">
                <mdb-btn color="primary">Button</mdb-btn>
              </div>

              <script src="https://cdn.jsdelivr.net/npm/vue/dist/vue.js"></script>
              <script src="https://cdn.jsdelivr.net/npm/mdbvue/lib/index.js"></script>
              <script>
                new Vue({
                  el: '#app',
                  components: {
                    mdbBtn: mdbvue.mdbBtn
                  }
                })
              </script>
            </body>

            </html>
            <!DOCTYPE html>
            <html>

            <head>
              <title>MDB Vue Test App</title>
              <meta charset="utf-8">
              <meta name="viewport"
                content="width=device-width, initial-scale=1, maximum-scale=1, user-scalable=no, minimal-ui">
              <link rel="stylesheet" href="https://stackpath.bootstrapcdn.com/bootstrap/4.3.1/css/bootstrap.min.css"
                integrity="sha384-ggOyR0iXCbMQv3Xipma34MD+dH/1fQ784/j6cY/iJTQUOhcWr7x9JvoRxT2MZw1T"
                crossorigin="anonymous">
              <link rel="stylesheet" href="mdbvue/lib/css/mdb.min.css">
            </head>

            <body>

              <div id="app">
                <mdb-btn color="primary">Button</mdb-btn>
              </div>

              <script src="https://cdn.jsdelivr.net/npm/vue/dist/vue.js"></script>
              <script src="mdbvue/lib/index.js"></script>
              <script>
                new Vue({
                  el: '#app',
                  components: {
                    mdbBtn: mdbvue.mdbBtn
                  }
                })
              </script>
            </body>

            </html>
Nuxt
To integrate MDB Vue with your Nuxt App you can easily use our installation module included in mdbvue library.
The PRO version of mdbvue module for Nuxt.js is available exclusively for
users with MDB Pro licence and GitLab access.
Prerequisites
Step 1
Create Nuxt App (default config)
npx create-nuxt-app nuxt-app
Step 2
Navigate to App's directory
cd nuxt-app
MDB installation
Step 1
Setup MDB
npm install mdbvue
Step 2
Add mdbvue/nuxt module to nuxt.config.js
            modules: [
            'mdbvue/nuxt'
            ],
Step 3 (optional)
Remove any asset if not necessary
            modules: [
              'mdbvue/nuxt'
            ],
            mdbvue: {
              icons: false, // FA5
              roboto: false, // font Roboto
              css: false, // MDB CSS
              bootstrap: false // Bootstrap CSS
            },
Prerequisites
Step 1
Create Nuxt App (default config)
npx create-nuxt-app nuxt-app
Step 2
Navigate to App's directory
cd nuxt-app
MDB installation
Step 1
Setup MDB by adding mdbvue dependency with path to downloaded tgz file or to our gitlab repo in package.json
            "dependencies": {
              "mdbvue": "git+https://oauth2:REPLACE_WITH_YOUR_TOKEN@git.mdbootstrap.com/mdb/vue/vu-pro.git",
              "nuxt": "^2.0.0"
            },
            "dependencies": {
              "mdbvue": "mdbvue-6.3.0.tgz",
              "nuxt": "^2.0.0"
            },
Step 2
Install dependencies
npm install
Step 3
Add mdbvue/nuxt module to nuxt.config.js
            modules: [
            'mdbvue/nuxt'
            ],
Step 4 (optional)
Remove any asset if not necessary
            modules: [
              'mdbvue/nuxt'
            ],
            mdbvue: {
              icons: false, // FA5
              roboto: false, // font Roboto
              css: false, // MDB CSS
              bootstrap: false // Bootstrap CSS
            },
Looking for a quicker way to start a project? Check out our quick start boilerplate: MDB Vue x Nuxt.js
Laravel - new project
This Laravel Preset is compatible with Laravel 6. For Laravel 7, add basic Vue preset and follow the instruction for an existing project.
To use MDB within a Laravel application, you can simply use mdbvue preset - you don't need to install Vue first, our preset will take care of it for you.
Prerequisites
Step 1
Create Laravel App
laravel new laravel-app
Step 2
Navigate to App's directory
cd laravel-app
MDB installation
Step 1
Use composer to get the mdbvue preset:
composer require mdbvue/laravel-preset
Step 2
Run the preset command:
php artisan preset mdbvue
Step 3
Type f in your console to install the free
version of mdbvue
Step 4
Install the dependencies:
npm i
Development
Step 1
Run watch-poll script - this way, you won't
need to run npm run dev each time your app changes:
npm run watch-poll
Step 2
Start your app:
php artisan serve
Prerequisites
Step 1
Create Laravel App
laravel new laravel-app
Step 2
Navigate to App's directory
cd laravel-app
MDB installation
Step 1
Use composer to get the mdbvue preset:
composer require mdbvue/laravel-preset
Step 2
Run the preset command:
php artisan preset mdbvue
Step 3
Type p in your console to install the pro
version of mdbvue
Step 4
Enter your gitlab token
Step 5
Install the dependencies:
npm i
Development
Step 1
Run watch-poll script - this way, you won't
need to run npm run dev each time your app changes:
npm run watch-poll
Step 2
Start your app:
php artisan serve
Looking for a quicker way to start a project? Check out our quick start boilerplate: MDB Vue x Laravel
Laravel - existing project
If you are already in the middle of developing Vue-Laravel application and you wish to start using MDB Vue follow the instructions below:
MDB installation
Step 1
Install MDB Vue
npm i mdbvue
Step 2
Add the following import statements to your
./resources/js/app.js file:
            require("bootstrap-css-only/css/bootstrap.min.css");
            require("mdbvue/lib/css/mdb.min.css");
            require("@fortawesome/fontawesome-free/css/all.min.css");
Step 3
Use MDB Vue components in your project:
            <template>
              <mdb-btn>MDB Button</mdb-btn>
            </template>
            <script>
              import {
                mdbBtn
              } from 'mdbvue';
              export default {
                components: {
                  mdbBtn
                }
              }
            </script>
Development
Step 1
Run watch-poll script - this way, you won't
need to run npm run dev each time your app changes:
npm run watch-poll
Step 2
Start your app:
php artisan serve
MDB installation
Step 1
In your package.json add the following dependecy (replace
YOUR_TOKEN with your gitlab token)
"mdbvue": "git+https://oauth2:YOUR_TOKEN@git.mdbootstrap.com/mdb/vue/vu-pro.git"
Alternatively, if you'd rather use .tgz file, move it to your project's main directory and replace the above line with:
"mdbvue": "mdbvue-[version].tgz"
Step 2
Install dependencies:
npm i
Step 3
Add the following import statements to your
./resources/js/app.js file:
            require("bootstrap-css-only/css/bootstrap.min.css");
            require("mdbvue/lib/css/mdb.min.css");
            require("@fortawesome/fontawesome-free/css/all.min.css");
Step 4
Use MDB Vue components in your project:
            <template>
              <mdb-btn>MDB Button</mdb-btn>
            </template>
            <script>
              import {
                mdbBtn
              } from 'mdbvue';
              export default {
                components: {
                  mdbBtn
                }
              }
            </script>
Development
Step 1
Run watch-poll script - this way, you won't
need to run npm run dev each time your app changes:
npm run watch-poll
Step 2
Start your app:
php artisan serve
Tree shaking
Consider tree shaking if you plan to import only a few of our components. Using this mode will significantly reduce the size of js output files.
To use this mode you just need to import each component separately from the mdbvue/lib/components
directory.
Basic example:
import { mdbContainer, mdbRow, mdbBtn } from 'mdbvue'
Tree shaking example:
        import mdbContainer from 'mdbvue/lib/components/mdbContainer'
        import mdbRow from 'mdbvue/lib/components/mdbRow'
        import mdbBtn from 'mdbvue/lib/components/mdbBtn'
Registering all components
To register all components globally in your app add the following code to main.js file. Keep in mind that this type of import will significantly increase the size of js output files.
        import * as mdbvue from 'mdbvue'
        for (const component in mdbvue) {
          Vue.component(component, mdbvue[component])
        }
SCSS editable mode
This mode let you write custom scss code, as well as update our scss core files or variables.
Keep in mind that editable styling mode will only work after installing node-sass and
sass-loader dependencies. This will be done automatically in basic installation
mode. Our CLI plugin will copy all necessary files to the mdb directory and will import them in
App.vue file between <style lang="scss"></style> tags, just like
in the example:
            $image-path: '~@/../mdb/mdbvue/img'; // image path variable update
            @import '~@/../mdb/mdbvue/scss/mdb-free.scss'; // main mdb scss free file
            @import url('https://fonts.googleapis.com/css?family=Roboto:300,400,500,700&display=swap'); // font import
import 'mdbvue/lib/mdbvue.css' // light css styles associated only with the Vue library
            $image-path: '~@/../mdb/mdbvue/img'; // image path variable update
            @import '~@/../mdb/mdbvue/scss/mdb-pro.scss'; // main mdb scss pro file
            @import url('https://fonts.googleapis.com/css?family=Roboto:300,400,500,700&display=swap'); // font import
import 'mdbvue/lib/mdbvue.css' // light css styles associated only with the Vue library
Plugins installation
MDB plugins are ready to use just after download is completed. To start the demo application, please follow these steps:
Step 1
Unzip archive
Step 2
Start terminal inside the plugin directory
Step 3
Install dependencies
npm install
Step 4
Launch your app
npm run serve
If you need to use the plugin in a custom project, follow the instructions below:
Step 1
Unzip archive.
Step 2
Copy plugin file (the one with tgz extension) from unpacked dir to an existing project.
Step 3
Add plugin to dependencies in package.json, i.e. "mdb-sortable": "./mdb-sortable-5.0.0.tgz".
Step 4
Install dependencies
npm install
Step 5
Import plugin inside your project by using the following
code: import mdbSortable from 'mdb-sortable'
import mdbSortable from 'mdb-sortable'
Step 6
Launch your app
npm run serve
If you want to install plugin from Plugin Pack repository, please follow these steps:
Prerequisites
Create Vue project
vue create app
Step 1
Add plugin pack to the project's dependencies inside package.json:
"mdb-plugin-pack": "git+https://oauth2:REPLACE_WITH_YOUR_TOKEN@git.mdbootstrap.com/mdb/vue/plugin-pack.git"
Step 2
Import any component from the plugin pack
import { mdbCalendar, mdbColorPicker } from 'mdb-plugin-pack'
Step 3
Import styles in main.js
            import 'bootstrap-css-only/css/bootstrap.min.css'
            import 'mdbvue/lib/css/mdb.min.css'

            import 'mdb-plugin-pack/MDB-Vue-Calendar/lib/main.css' // only in some plugins
            import 'mdb-plugin-pack/MDB-Vue-Color-Picker/lib/main.css' // only in some plugins
Token generation
Step 1
Visit https://git.mdbootstrap.com and log in. If you are a PRO user, you should receive an email (from GitLab) with an activation link, after purchase (please check your spam folder as well). This email is send to the email address used for billing.
Step 2
From top right corner click at your avatar and choose "Setting → Access Tokens."
Step 3
Provide a Name for your token and choose "api" from scopes. Then click "Create personal access token"
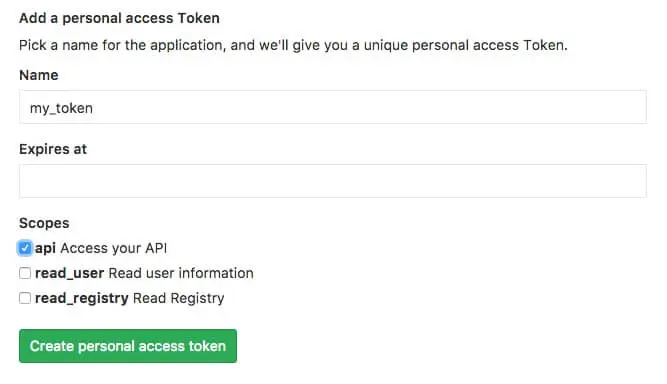
Step 4
Once your token will be generated make sure to copy it and store in safe place. You won't be able to access it again. In case of lose, you will have to generate new token again.
