MDB Angular Boilerplate installation guide
MDB Angular Boilerplate is an Angular CRUD application starter with NgRx state management and Firebase backend
Important information!
Before using our starter application, follow the steps below to create and configure a Firebase project.
2. Create new firebase project
4. Configure database access rules
1. Download application files
Download or clone application files from our Github repository.
DOWNLOADOpen downloaded folder in your code editor and run
npm install command to install all dependencies.
2. Create new Firebase project
In order to take advantage of the benefits provided by Firebase, you need to create new project.
To do this, open the following page in your browser: https://console.firebase.google.com/
To create new application, click the "Add project" button and fill in a short form in which you will choose the name of your project.
After creating new Firebase application, you need to add it's config to the Angular files. To do this, click "Add Firebase to your web application ( icon) and then copy the entire config object to clipboard.
Then open the environment.ts and environment-prod.ts files in your MDB
Angular Boilerplate project and add Firebase config object from the previous step.
Your environment file shoud look like this
        export const environment = {
        production: true,
        firebase: {
        apiKey: 'your firebase api key',
        authDomain: 'xxxx-d58ec.firebaseapp.com',
        databaseURL: 'https://xxxx-d58ec.firebaseio.com',
        projectId: 'xxxx-d58ec',
        storageBucket: 'xxxx-d58ec.appspot.com',
        messagingSenderId: 'your messaging sender id'
        }
        };
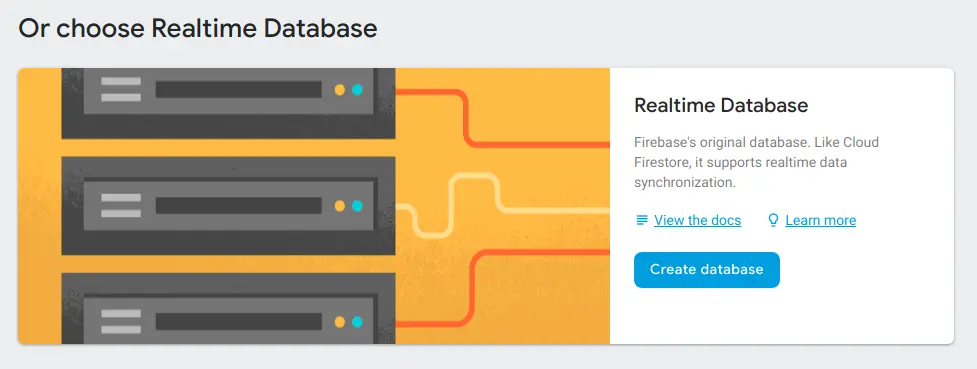
3. Create new database
Open your Firebase project and from the sidenav on the left select Database. On the page find Real time database and click "Create new database" button (choose block mode).
4. Configure database access rules
You need to add access rules for your database, so that the users have access to their content
To do that, go to database section in your Firebase project and click on "Rules" tab at the top of the page
Replace your current rules with following data:
          {
            "rules": {
              ".read": false,
              ".write": false,

                "projects": {
                  "$project": {
                    ".write": "auth.uid == $project || root.child('admins').child(auth.uid).val() === true",
                    ".read": "auth.uid == $project || root.child('admins').child(auth.uid).val() === true"
                  }
                },

                "customers": {
                  "$customer": {
                    ".write": "auth.uid == $customer || root.child('admins').child(auth.uid).val() === true",
                    ".read": "auth.uid == $customer || root.child('admins').child(auth.uid).val() === true"
                  }
                },

                "users": {
                  ".read": "root.child('admins').child(auth.uid).val() === true",
                  "$user": {
                    ".write": "auth.uid == $user || root.child('admins').child(auth.uid).val() === true",
                    ".read": "auth.uid == $user || root.child('admins').child(auth.uid).val() === true",
                  }
                },

                "admins": {
                  "$admin": {
                    ".write": "root.child('admins').child(auth.uid).val() === true",
                    ".read": "auth.uid == $admin || root.child('admins').child(auth.uid).val() === true"
                  }
                }
            }
          }
5. Enable authentication methods
You need to enable authentication methods to allow users to create new accounts and log in into application.
To do that, open your Firebase project and in the sidenav on the left select Authentication.
Then at the top of the page select Sign-in method tab.
Email/password
In "Sign-in providers" table click on "Email/Password", turn on first option and save. Now the users can login and register with email and password.
In our starter app we also provided methods that allow to log in with social media (Google, Facebook,
Twitter). You can enable those method as well in your Firebase project console. Please note that to enable
Facebook and Twitter sign-in methods you need to have access to Facebook and Twitter developer accounts and
provide appId and secret key.
In "Sign in methods" tab in your Firebase console, click on Google method, turn it on with switch element, provide email address and save.
In "Sign in methods" tab in your Firebase console, click on facebook method, turn it on with switch element and copy the callback URL. Then in new browser tab open https://developers.facebook.com page.
From the "My apps" dropdown at the top right corner of the page, choose "Add new app" option, add your app name and submit the form.
On the sidenav on the left, click "Products" button and set up new Facebook login. Now under the products button you should see your Facebook Login product. Open settings, paste the link you copied from Firebase console to the "Valid OAuth Redirect URIs" input and save changes.
At the top of the sidenav open basic settings, copy the App ID and App Secret, paste them to your Firebase console and save.
You just enabled facebook login in the starter app.
In "Sign in methods" tab in your Firebase console, click on twitter method, turn it on with switch element and copy the callback URL. Then in new browser tab open https://developers.twitter.com page.
Log in to your twitter account and create new project. Once you have a project, from the dropdown at the top right corner of the page choose "Apps" category and click "Create new app" button. Now you need to fill the short form - add projects name, select "Enable Sign in with Twitter" checkbox and paste the link you copied from Firebase console to the "Callback URLs" input.
After completing the form, you should see "App details" page. Go to "Keys and tokens" tab, copy API key and API secret key to your Firebase console and save. Your twitter login will now work correctly.
6. Get access to application admin panel
In our starter app, we added admin panel, in which you can manage users and their content. Admin panel is only visible to the users with special access.
In order to add admin access to your account, run our starter app with ng serve command, go to Register section and create new account.
Then open your Firebase console, and from the sidenav menu select Database
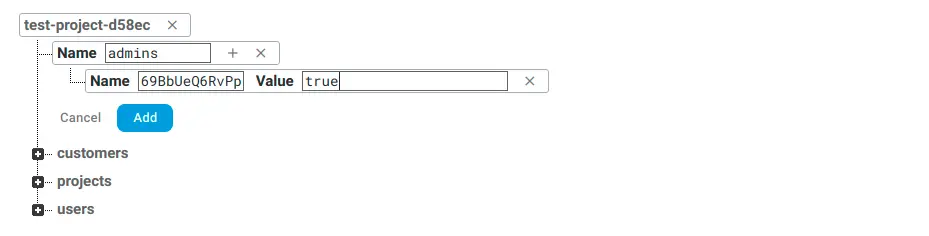
Click on the plus icon to expand users list and copy user unique id to clipboard (you can expand user properties to make sure this is the account that should have access to admin panel)

Hover over project name and click on the plus icon to add new category. Add "admins" string to the name field and leave value field empty. Then click on the plus icon on the right to add new admin user. In name field paste the user unique id you copied from the users list, set value field to true and click add.
When you open the starter application again, you should see "Admin panel" link in the navbar. You can now manage users content and add or remove admin privileges.
Use with MDB Angular Pro
By default, our template uses components available in the MDB Angular Free version (angular-bootstrap-md), but it is possible to change this configuration and install MDB Angular Pro (ng-uikit-pro-standard). In order to do that, follow these steps:
- Remove
angular-bootstrap-mddependency frompackage.jsonfile. - Install MDB Angular Pro with following command (if you haven't created your own MDB gitlab token, you can learn how to do it in our quick start guide):
npm install git+https://oauth2:YOUR_TOKEN@git.mdbootstrap.com/mdb/angular/ng-uikit-pro-standard.git --save - Open the
angular.jsonfile and update thestylesarray:"node_modules/@fortawesome/fontawesome-free/scss/fontawesome.scss", "node_modules/@fortawesome/fontawesome-free/scss/solid.scss", "node_modules/@fortawesome/fontawesome-free/scss/regular.scss", "node_modules/@fortawesome/fontawesome-free/scss/brands.scss", "node_modules/ng-uikit-pro-standard/assets/scss/bootstrap/bootstrap.scss", "node_modules/ng-uikit-pro-standard/assets/scss/mdb.scss", "src/styles.scss" - Update import paths of the MDB Angular modules. You can use your IDE/Code Editor to search for all occurencies of
angular-bootstrap-mdand replace it withng-uikit-pro-standard